
DetailOAR Field Manual · Interior specialty cleaning
Pet Hair and Odor Removal
Take on pet hair and odor the honest way: document the condition, protect yourself, recover the hair dry, treat the actual source, dry the materials, and skip unsafe masking and ozone claims.
Save or use this guide
Contents
Start
Know the outcome.
Bring down hair and source-based odor without scattering allergens, soaking hidden materials, hiding smells under fragrance, or exposing anyone to ozone.
Audience, time, and cost
Technicians handling ordinary pet hair and organic odor. Active mold, pests, bodily fluids, or extensive urine saturation may call for specialist remediation or component replacement.
Time and costLight hair may add an hour. Embedded hair or deep source contamination can eat a full day — and that calls for a revised estimate.
Before you start
Ask about the source, how long it’s been there, the animal, allergies, prior products, and wet incidents. Then inspect seats, carpet, cargo area, vents, padding access, and material damage.
Tools and materials
- high-filtration vacuum
- pet-hair tools suited to material
- inspection light
- air movers
- source-compatible cleaner or enzyme product if approved
- PPE
- sealed waste bags
- fresh towels
Steps
Do the work in order.
-
Step 1 Inspect and price condition
Photograph the zones, lift the mats you can reach, check seams, cargo, and spare areas, identify any wet or biological source, and set up a test section.
-
Step 2 Prepare containment and PPE
Ventilate, bag customer items per policy, keep clean tools isolated, wear suitable PPE, and position the vacuum so its exhaust doesn’t redistribute what you just captured.
-
Step 3 Recover loose hair dry
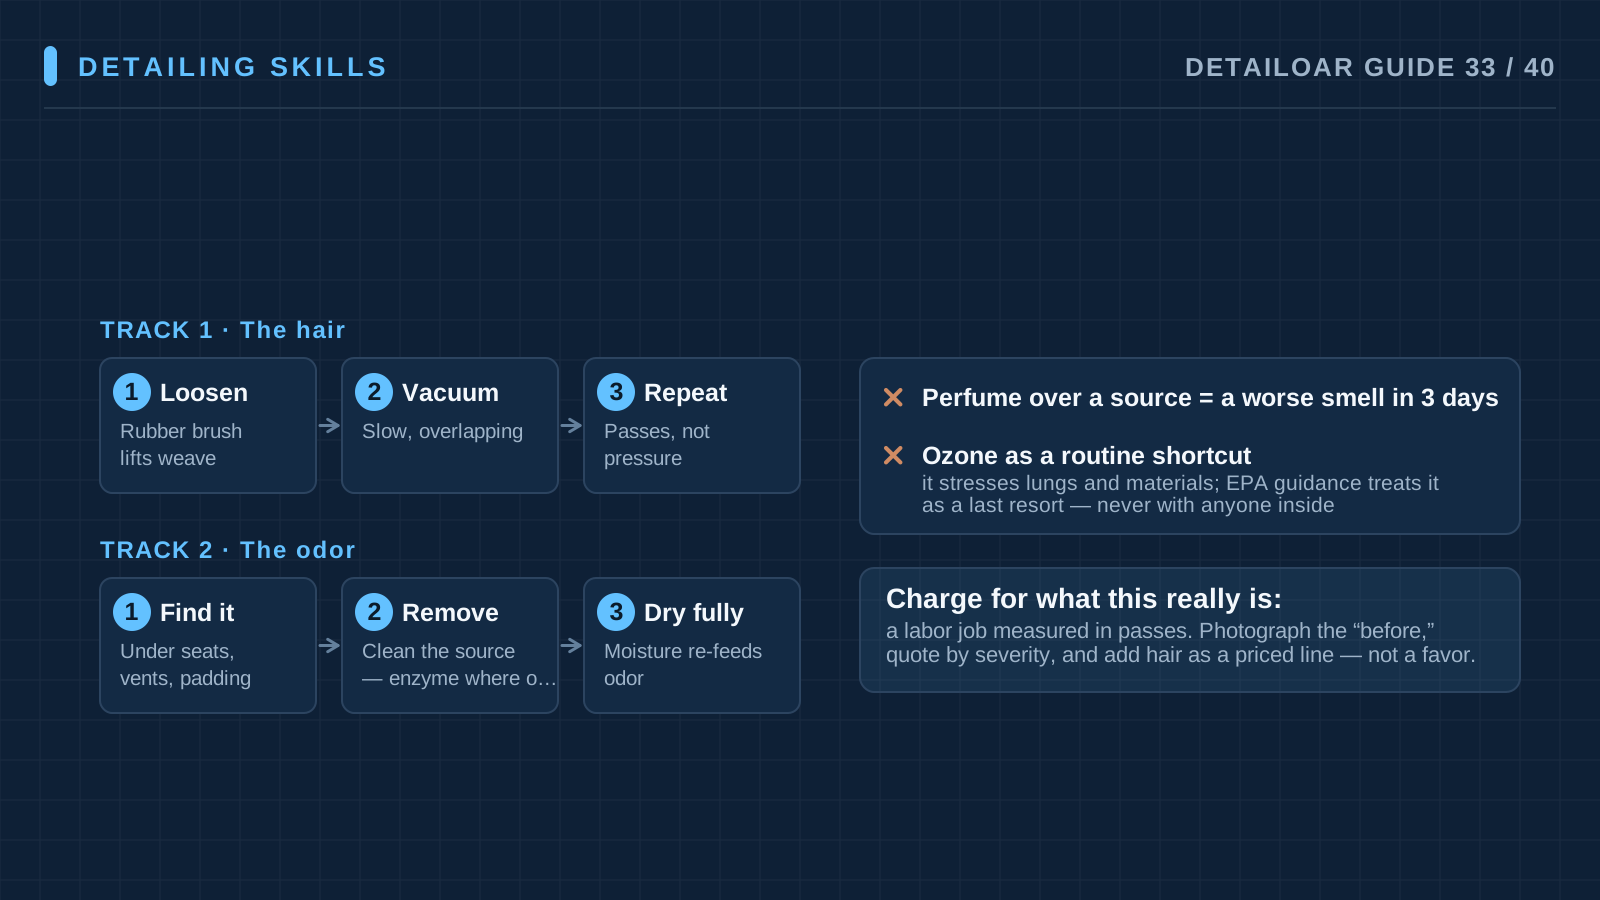
Vacuum slowly, overlapping your passes, with the right attachments — before any aggressive brushing or air.
-
Step 4 Release embedded hair carefully
Work material-safe rubber, fabric, stone, brush, or towel methods over small areas while vacuuming as you go. Protect the loops, nap, leather, plastics, and seat seams.
-
Step 5 Locate and treat odor source
Find it with your eyes, the history, controlled moisture checks, and material access. Apply only a label-approved compatible product with its required dwell and recovery.
-
Step 6 Recover residue and dry fully
Extract or blot as the job calls for, clean your tools, keep safe air moving with good ventilation, and inspect padding or hidden zones where source may remain.
-
Step 7 QC and explain limits
Reinspect the seams under light, run a clean-towel check, judge the odor after ventilation, photograph any remaining wear or staining, and explain how to keep it from coming back.
Reference
Use the detail when you need it.
How it works
Hair is a dry-removal problem first. Odor is a source problem — fragrance changes what the nose reports, not what’s in the car. Work from loose hair to embedded hair, then treat only the source depth you’ve identified and can treat compatibly, and dry everything fully.
Terms used in this guide
- Source removalPhysically removing or properly treating the material making the odor — instead of covering up its smell.
- Cross-contaminationCarrying hair, allergen, soil, or product from one zone into another.
Common mistakes
- Blasting compressed air before controlled recovery.
- Dragging harsh tools across delicate fabric.
- Spraying deodorizer before inspecting the source.
- Overwetting the foam or headliner.
- Treating ozone as a routine shortcut.
- Guaranteeing the odor is gone for good.
Troubleshooting
- Hair remains in carpet loopsChange your angle and your material-safe release tool, work smaller sections while vacuuming at the same time, and stop before the fibers pay for it.
- Odor returns after dryingThe source may still be in the padding, backing, vents, or somewhere you can’t reach. Inspect the depth and revise scope — or recommend replacement or specialist work.
- Customer reports fragrance sensitivityUse fragrance-free compatible products where they exist, disclose any odors you can’t avoid, ventilate, and add no masking scent at all.
Finish
Check the result and close the loop.
What good looks like
- Normal contact no longer pulls hair loose.
- Clean zones stayed clean.
- Odor was judged after ventilation, not under perfume.
- Treatment depth matched source depth.
- Materials are dry.
- Permanent damage and replacement needs are in writing.
Final checklist
- Condition and source documented
- PPE and containment used
- Loose and embedded hair recovered
- Source treated compatibly
- Residue recovered
- Interior dry and ventilated
- Limits and aftercare explained
What to do next
- Suggest a maintenance interval that fits the situation.
- Offer protective liners only if they fit the customer’s needs.
- Escalate deep contamination that sits beyond safe access.
More
Continue only where it helps.
Prerequisites
The Complete Interior Reset Process19 min readLearning paths with this guide
Learn Interior Detailing7 guidesFrequently asked questions
Can pet odor always be removed?
No. Deep contamination, material damage, padding you can’t reach, moisture, or repeated incidents may mean replacement or specialist remediation.
Should I use ozone?
Do not treat ozone as a routine tool or an occupied-space solution. It can harm lungs and materials, and it does not replace source removal. Follow public-health and qualified guidance.
Why is pet hair an extra charge?
Embedded hair can multiply the labor and the tool cleaning. Point to the observable condition and the approved added time — never an arbitrary surprise fee.
Sources and review
Reviewed by DetailOAR Editorial Review on July 15, 2026. Verify current labels, interfaces, prices, and local requirements before acting.
- Occupational Safety and Health Administration — Hazard Communication
- Occupational Safety and Health Administration — Personal Protective Equipment
- U.S. Environmental Protection Agency — Ozone generators that are sold as air cleaners
- Centers for Disease Control and Prevention — Mold cleanup in your home
Related field guides
 Detailing SkillsCarpet and Upholstery Stain Removal and ExtractionFigure out the stain and the fiber before touching either, test for colorfastness, use controlled chemistry and gentle agitation, extract with minimal moisture, dry fully, and note what won’t come out.
 Detailing SkillsHow to Clean Leather, Plastics, Screens, and Interior GlassKnow what each interior surface is made of, use the gentlest compatible method that works, protect the controls and coatings, and leave leather, plastics, screens, and glass residue-free.
 Detailing SkillsFinal Quality Control, Customer Handoff, and Working Faster Without Cutting CornersPut staged quality gates, a fixed final inspection route, an evidence-based handoff, and honest time studies to work — and raise throughput without deleting safety or quality.