
DetailOAR Field Manual · Inspection
Vehicle Check-In, Inspection, and Damage Documentation
A calm, repeatable check-in that confirms who and what you’re working on, records the condition the car arrived in, keeps media private, and gets acknowledgment before work begins.
Save or use this guide
Contents
Start
Know the outcome.
Walk away with a time-stamped condition record tied to the right customer, vehicle, job, scope, keys, and approvals — all before anyone touches the vehicle.
Audience, time, and cost
Anyone taking custody of a customer’s vehicle at a shop or mobile site, and any technician who needs solid evidence when scope changes or damage questions come up.
Time and costGive a routine vehicle 10 minutes. Give more to anything high-value, modified, dirty, dark, or previously damaged.
Before you start
Settle your inspection route before the car shows up. Line up private storage, permission language, a clean camera lens, a safe parking spot, and a way to escalate anything unsafe or disputed.
Tools and materials
- inspection light
- phone or camera
- tire tread/depth gauge optional
- digital inspection form
- clean pointer or non-marking marker
- key tag
- customer acknowledgment
Steps
Do the work in order.
-
Step 1 Verify identity and authorization
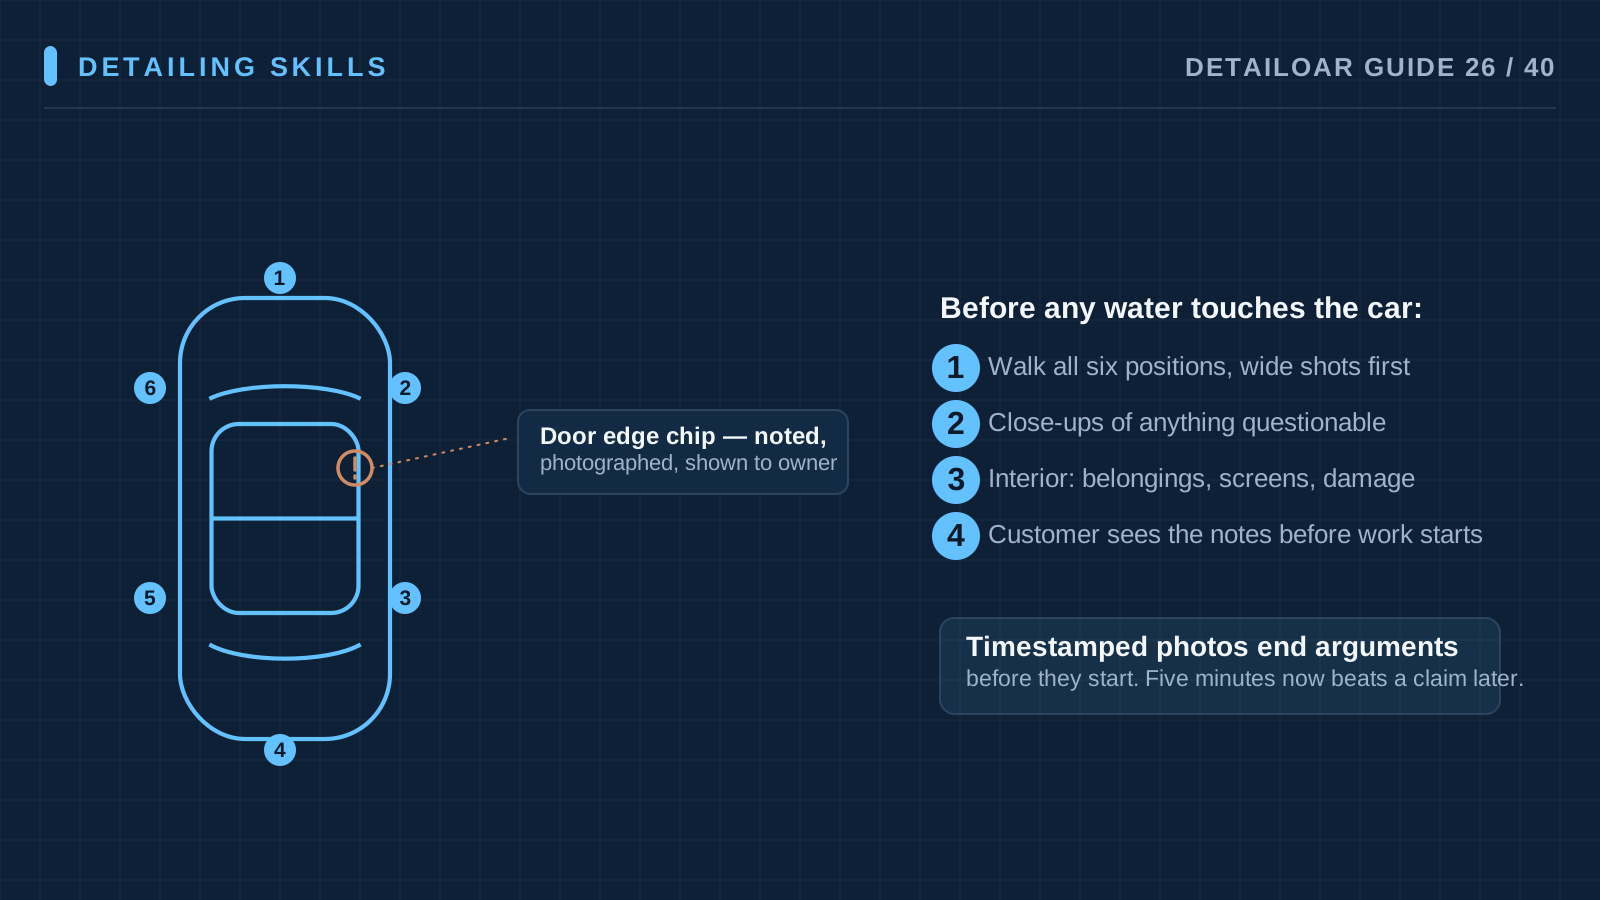
Match the customer to the car: year/make/model, plate or VIN where appropriate, mileage, fuel or charge, key count, service, estimate, contact, and who’s allowed to approve changes.
-
Step 2 Ask about history and priorities
Ask, then write it down: repaints, coatings, wraps, tint, repairs, warning lights, leaks, fragile items, valuables, child seats, and the customer’s number-one concern.
-
Step 3 Walk the exterior in one direction
Shoot the four corners, then work each panel, trim piece, glass, light, wheel, tire, camera, sensor, emblem, and loose part under light that shows you something.
-
Step 4 Inspect the interior systematically
Check entry points, seats, belts, controls, screens, vents, headliner, carpets, cargo area, odors, moisture, personal items, and safety-sensitive surfaces — look, don’t rummage.
-
Step 5 Confirm scope and change triggers
Compare what you found against the estimate, and explain anything that needs testing, added time, another service, or refusal. Don’t start added work yet.
-
Step 6 Review and acknowledge
Show the customer the significant findings and the photo count, confirm valuables, key handling, and policies, then capture their acknowledgment — or note how they’ll review remotely.
-
Step 7 Secure the record and vehicle
Attach the media to the correct job with private access, tag the keys, protect the vehicle, and shut off downloads or public use.
Reference
Use the detail when you need it.
How it works
An inspection is a shared factual record, not a trick for dodging responsibility. Walk the same order every time. Shoot context before close-ups, learn to tell dirt from visible damage, write down what you’re unsure of, and invite the customer to look at the important findings with you.
Terms used in this guide
- Context photoThe wider shot that shows where on the vehicle a close-up defect actually sits.
- AcknowledgmentA record that the customer received and reviewed the information — not a blanket waiver of reasonable care.
Common mistakes
- Inspecting after the first wash instead of before it.
- One lonely close-up with no location context.
- Calling every mark damage before the car is clean.
- Leaving keys untagged.
- Posting inspection photos as if marketing consent covered them.
Troubleshooting
- The vehicle is too dirty to assess paintSay so in the record. Inspect the visible high-risk areas, then schedule a post-wash condition review before any correction or irreversible work.
- Customer disputes a findingStay factual. Review the context images together, note the disagreement, and pause the related work until scope is settled.
- A serious safety issue appearsStop. Secure the area, notify the customer or owner, and bring in qualified help instead of attempting a repair outside your lane.
Finish
Check the result and close the loop.
What good looks like
- Photos cover the whole vehicle, not just the sore spots.
- Wide shots and close-ups tell the same story.
- Descriptions stay neutral and name the location.
- Scope changes wait for approval.
- Media stays private by default.
- The customer can get a copy.
Final checklist
- Identity and authorization verified
- History and priorities on record
- Exterior and interior route complete
- Context and close-ups linked
- Scope confirmed
- Acknowledgment stored
- Keys and media secured
What to do next
- Begin the approved service and nothing else.
- Let the inspection double as your before-photo baseline.
- Update the record the moment hidden condition turns up.
More
Continue only where it helps.
Learning paths with this guide
Learn Exterior Detailing6 guidesLearn Interior Detailing7 guidesSet Up DetailOAR8 guidesFrequently asked questions
How many photos should an inspection include?
Enough to show every exterior side, each key interior zone, and every defect that matters, with context. Work from a required shot list instead of chasing a universal number.
Should the customer sign every photo?
Usually not. They review an organized inspection and acknowledge it as a whole rather than signing each image. Get jurisdiction-specific advice for the exact workflow.
What if damage is found after washing?
Stop the related work. Document what’s newly visible, compare it with your earlier context shots, notify the customer, and get approval before scope changes.
Sources and review
Reviewed by DetailOAR Editorial Review on July 15, 2026. Verify current labels, interfaces, prices, and local requirements before acting.
Related field guides
 Marketing and SalesHow to Take Before-and-After Photos That Sell the WorkShoot consistent, honest before-and-after photos that document condition, show off real workmanship, and keep your customers’ privacy protected.
 Detailing SkillsThe Safe Exterior Wash Process From Start to FinishWash an exterior the controlled way: cool surfaces, a real pre-rinse, lubricated contact, dirty tools kept away from clean paint, a full rinse, safe drying, and a final inspection.
 Detailing SkillsFinal Quality Control, Customer Handoff, and Working Faster Without Cutting CornersPut staged quality gates, a fixed final inspection route, an evidence-based handoff, and honest time studies to work — and raise throughput without deleting safety or quality.